Functions for TCP and HTTP-based applications that spreads requests across multiple servers.
17, May 2021 Avenash Kumar
As organizations are migrating from there monolithic designed applications to microservices. This migration has greatly impacted how applications are scaled, secure and managed. HAProxy stands for High Availability Proxy, is a Software Load Balancer and Application Delivery Controller. It comes with all the ingredients that can make any application more secure and reliable, which includes build-in rate limiting, anomaly detection, connection queuing, health checks, detailed logs and metrics etc. This article will cover installation and configuration of HAProxy for balancing L4 and L7 network traffic. Described configurations can be tweak and tune for most load balancing requirements. The setup is simplified from a typical production setup and will use a single node HAProxy server, along with five application server instances (running inside docker container, within the same host) that will interact with database to serve requests forwarded from the HAProxy.
1) This article will use L4 and L7 wherever possible. This refers layer 4 and layer 7 of OSI model, respectively. When discussing load balancing across the industry today, solutions are often bucketed into categories L4 and L7. L4 load balancer is generally unaware about any application details, as it deals with TCP/UDP packets. However, L7 load balancer can be used to make complex decisions for balancing network traffic, as it deals with actual message content.
2) This guide uses term application server in various sections. It refers to any web server, api server or any server that serve user requests.
Why we need network load balancer?
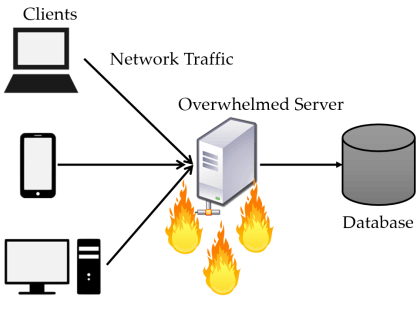
As the name suggest, load balancer is a way to maintain network traffic equilibrium across available application or web servers. Generally, application/web servers alone are not robust enough to handle extreme network traffic during busy times of the year.
Moreover, for some reason if the server goes down end user would no longer be able to access
the application. Load balancer brings flexibility, reliability, and availability. It is
considered as an essential component for any simple or complex, normal or enterprise web
application.
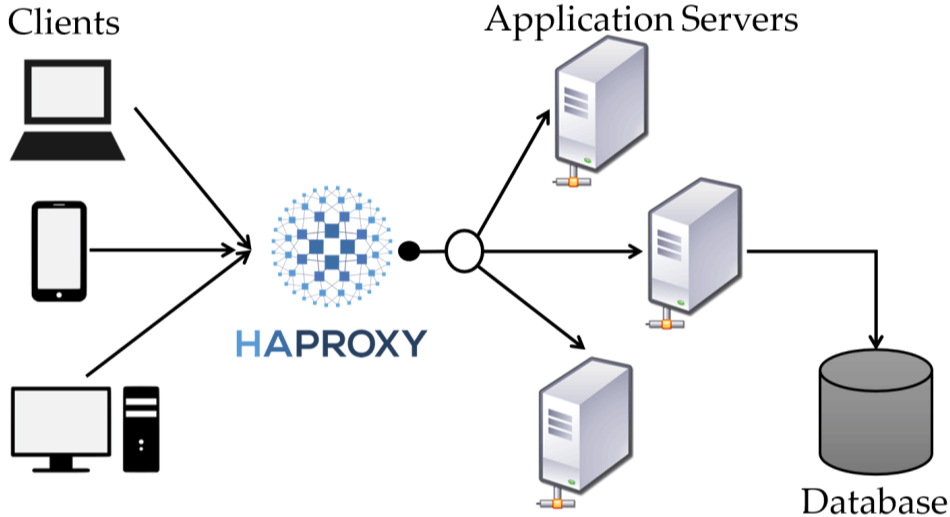
HAProxy can handle enormous volumes of network
traffic with very little resource usage. High trafficking websites like Twitter, Facebook,
Instagram, Reddit serving millions of requests per second through HAProxy.
You
don't have to work in such IT giants to defend usage of a network load balancer. Even a
simple self-hosted web application/site/API requires load balancer to ensure availability,
scalability and security. It is more like necessity, rather than good to have
thing!
To get started, I have used single node environment to spin up HAProxy server
and Spring Boot application servers through docker. HAProxy will distribute incoming traffic
among configured application servers. In the later part will see how we can limit end users
to use specific endpoints of an application through ACLs (Access Control Lists).
HAProxy is included in the package management systems of most Linux distributions:
MacOS:
brew install haproxy
Ubuntu 18.04:
sudo apt-get install haproxy
RHEL 8/CentOS 8:
sudo yum install haproxy
HAProxy forwards incoming requests to application server in order to get it processed. It
doesn't serve any incoming traffic directly. For this exercise I have created a Spring Boot
application, which exposes four endpoints /endpoint1, /endpoint2, /admin, /. The
complete source code and snippets for this article are available on my GitHub project.
For the sake of ease and simplicity docker
container environment is used to spin up five instances.
docker run -p 8081:80 -d avenashkumar/haproxy-demo-spring-boot-app --appId="Server 1"
docker run -p 8082:80 -d avenashkumar/haproxy-demo-spring-boot-app --appId="Server 2"
docker run -p 8083:80 -d avenashkumar/haproxy-demo-spring-boot-app --appId="Server 3"
docker run -p 8084:80 -d avenashkumar/haproxy-demo-spring-boot-app --appId="Server 4"
docker run -p 8085:80 -d avenashkumar/haproxy-demo-spring-boot-app --appId="Server 5"
These application servers prints message (such as
"Server 1: Hello from Endpoint1"). Typically, you can consider these as an actual application
servers running either on Kubernetes Pod or VM.
Assuming your docker containers are
running, you should be able to access
At the bare minimum HAProxy requires at least two
sections 1) frontend and 2) backend configuration. The frontend configuration covers node by
which HAProxy listens for connections. Backend configuration deals with application servers
where HAProxy can forward requests.
Frontend Configurations:
frontend www.myapp.com
bind *:8080
timeout client 60s
default_backend all_app_servers
frontend: This
represents start of frontend configuration section. You may have more than one frontend section
in you configuration file, depending on web servers you want expose to the internet. Each
frontend requires name, such as www.myapp.com to differentiate it from
others.
bind: This directive assigns a listener to a given IP
address and port. The IP can be omitted to bind to all IP addresses on the server.
Perhaps, port can be a single port, a range, or a comma-delimited
list.
timeout client: This setting measures inactivity during
periods that we would expect the client to be speaking. The “s” suffix denotes time in
seconds.
default_backend: This setting can be found in almost
every frontend section. It requires the name of a backend to send traffic to (which is why this
name should be same as your backend configuration name). Moreover, it can be use with
use_backend setting, if a request is neither routed by use_backend nor default_backend
directive, HAProxy will return a 503 Service Unavailable error.
Backend Configurations:
backend all_app_servers
timeout connect 10s
timeout server 100s
server server1 127.0.0.1:8081
server server2 127.0.0.1:8082
server server3 127.0.0.1:8083
server server4 127.0.0.1:8084
server server5 127.0.0.1:8085
backend: Like
frontend this represents start of backend configurations, where we are tend to define
group of servers that will be load balanced and assigned requests to serve. It also requires
string value that uniquely identify backend configuration, if multiple backend sections are
there.
timeout connect: Time that HAProxy will wait for a TCP
connection to a backend server to be established. The “s” suffix denotes seconds. Without any
suffix, the time is assumed to be in milliseconds.
timeout
server: This setting measures inactivity when we would expect the
backend server to be speaking. When a timeout expires, the connection is closed. Having sensible
timeouts reduces the risk of deadlocked processes tying up a connections that could otherwise be
reused.
server: Server directive is the heart of the backend section. Its
first argument is a name, followed by the IP address and port of the backend server. You can
specify a domain name instead of an IP address. In that case, it will be resolved at startup.
All together, this is how my HAProxy configuration file cfg-haproxy.config look like:
frontend www.myapp.com
bind *:8080
timeout client 60s
default_backend all_app_servers
backend all_app_servers
timeout connect 10s
timeout server 100s
server server1 127.0.0.1:8081
server server2 127.0.0.1:8082
server server3 127.0.0.1:8083
server server4 127.0.0.1:8084
server server5 127.0.0.1:8085
You might have some questions like which load
balancing algorithm will be used, when running HAProxy? or what type (L4/L7) of load
balancer it is? well these are good questions to ask. By default HAProxy uses
roundrobin strategy to distribute traffic across available servers. Moreover, it
supports variety of load balancing strategies e.g. leastconn (least connections),
source, URI, etc. If you want to use any strategy other than roundrobin. You need to
provide balance directive along with strategy name in your backend configuration.
As far as the type of load balancer is concerned, by default HAProxy operates as a
simple L4 load balancer. In order to spin up HAProxy as L7 load
balancer, you will need to provide mode directive along with http
for L7 or tcp for L4 in both front
and backend sections:
frontend www.myapp.com
bind *:8080
timeout client 60s
mode http
default_backend all_app_serversbackend all_app_servers
timeout connect 10s
timeout server 100s
balance roundrobin
mode http
server server1 127.0.0.1:8081
server server2 127.0.0.1:8082
server server3 127.0.0.1:8083
server server4 127.0.0.1:8084
server server5 127.0.0.1:8085
Finally! you can spin up your HAProxy load balancer. Yay!!!
haproxy -f cfg-haproxy.config
Now you should be able to access localhost:8080/endpoint1 and confirm roundrobin strategy by hitting same endpoint again and again. If you want behavior same as sticky sessions, you can use source instead roundrobin in balance directive. But better not to do that! this will reduce scalability, as each time request will land on same application server.
You may have encountered in a situation where you want to restrict your end user from accessing specific endpoints of your API. e.g. In the current setup I have exposed /admin endpoint which I want to restrict from my end user. HAProxy lets you to define rules to redirect or deny any incoming network traffic. Access Control Lists (ACLs) are the core component of HAProxy. They let you to build conditional checks which can filter and direct network traffic in a real-time.
http-request deny if { path -i -m beg /admin }
http-request directive indicates that any http request that is accessing
/admin endpoint will gets blocked. This configuration should placed in
frontend configuration section to make it work!
Consider a situation where I want to handle incoming
traffic for /endpoint1 from server1 and server2. Similarly, server3 and server4 are
dedicated for serving requests for /endpoint2, while server5 for all other
incoming requests. This setup is suitable for cases when some of the application endpoints are
taking much longer time in HTTP request/response life cycle. In such cases you don't want your
end user to get stuck in waiting queue.
Again!! Thanks to ACLs, with bare minimum
configurations this behavior can be achieved easily.
frontend www.myapp.com
bind *:8080
timeout client 60s
mode http
acl app1 path_end -i /endpoint1
acl app2 path_end -i /endpoint2
use_backend app1_backend if app1
use_backend app2_backend if app2
default_backend all_app_backend
backend app1_backend
timeout connect 10s
timeout server 100s
balance leastconn
mode http
server server1 127.0.0.1:8081
server server2 127.0.0.1:8082
backend app2_backend
timeout connect 10s
timeout server 100s
balance roundrobin
mode http
server server3 127.0.0.1:8083
server server4 127.0.0.1:8084
backend all_app_backend
timeout connect 10s
timeout server 100s
balance roundrobin
mode http
server server5 127.0.0.1:8085
acl: This setting requires name followed by
condition.
use_backend: Directive allows you to specify conditions
for using any available backend in the configuration file. e.g., to send incoming traffic
from /endpoint1 to app1_backend backend, you can combine
use_backend with an ACL that checks whether the URL path begins with
/endpoint1.
Here I have created three backend systems, app1_backend is responsible for serving any incoming request for /endpoint1. Similarly, app2_backend will serve any incoming network traffic for /endpoint2, while all_app_backend handles all other requests. You might wonder why app1_backend is using leastconn strategy, instead roundrobin. Assuming in our current setup /endpoint1 is taking much longer time to complete HTTP request/response life cycle. In such cases, often roundrobin strategy doesn't work really well. Perhaps, leastconn do the job better. Using leastconn HAProxy will send requests to servers with the fewest active connections, which reduces chances of server being overloaded.
Although I discussed very few set of features that
HAProxy supports, you now have a load balancer that listens on ports 8080, balancing network
traffic across several backend application servers, secure sensitive application endpoints
(/admin) and even sending traffic matching a specific URL pattern to a different
backend servers.
This exercise might seem simple but you have just built and configured a very powerful load
balancer capable of handling a significant amount of network traffic.
Again, For your convenience, I put all the code and configurations used in this article in
my GitHub repo.